Tag: facebook

  • How to view Locked Facebook Profile Photos

    Have you ever landed on someone’s Facebook profile and wondered why all their photos are locked? Maybe you’re trying to find an old friend, confirm someone’s identity, or satisfy your curiosity — only to see a blurred display picture and a “This content isn’t available” message.

    It’s frustrating, right?
    The good news is: while you can’t break into a private Facebook account, there are legit and privacy-friendly methods to view publicly available or shared-with-you photos — without violating any rules.

    HOW TO VIEW LOCKED FACEBOOK PROFILE PHOTOS

    Methods to View Locked Facebook Profile Photos :

    In this guide, you’ll learn how to view locked Facebook profile photos safely, what limits Facebook’s privacy settings create, and which trusted tools or tricks can help you see what’s legally visible.

    Before diving into the methods, let’s understand what a “locked profile” actually means.

    Understanding Facebook’s Locked Profile Feature:

    When a Facebook user locks their profile, they’re using a privacy feature that:

    • Restricts full-size photo viewing to friends only

    • Limits access to timeline content

    • Prevents downloading or zooming in on the profile picture

    • Blocks non-friends from tagging or sharing posts

    Facebook’s locked profile feature ensures users’ personal media stays private.
    So, any “hack” or third-party app claiming to unlock it completely is not only unreliable but also against Facebook’s terms of service.

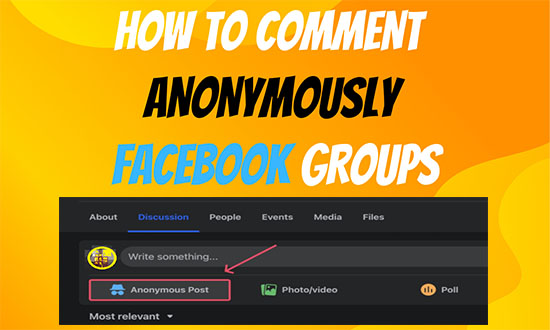
    Learn to comment Annonymously in Facebook Groups

    1. Check What’s Publicly Visible (Simple Method):

    Even on locked profiles, certain photos or albums may still be public — especially:

    • Cover photos

    • Profile pictures uploaded before the lock.

    • Tagged photos are visible through mutual friends.

    Steps to Try:

    1. Visit the person’s profile.

    2. Click Photos → Albums (if available).

    3. Check Profile Pictures and Cover Photos folders.

    4. Use the Posts tab to see any public uploads.

    Sometimes, older posts remain visible due to outdated privacy settings.
    You can also try searching their name in Facebook’s image search bar or Google Images with this query:

    site:facebook.com "username"

    2. Use Facebook Mutual Friends Feature:

    Somehow, if you are unable to access directly, then there is an option of mutual friends. Mutual facebook friends can often give you indirect access to photos.

    How it Works:

    • Go to a mutual friend’s profile.

    • Check their Tagged Photos section.

    • Photos featuring the locked-profile person may appear there (if the friend’s settings allow it).

    This method doesn’t break any rules — it simply leverages Facebook’s connection network.

    Note: If you want to reconnect, try sending a friendly message request explaining who you are. Once they accept, their locked photos automatically become visible according to their friend settings.

    3. Try Facebook Archive & Activity Log (for Your Own Account)

    Sometimes, you may want to view photos from your old, locked profiles or deactivated accounts.
    Here’s how to access them safely:

    1. Go to Settings → Your Facebook Information.

    2. Click Download Your Information.

    3. Choose Photos and Videos and generate a download file.

    This feature is official and privacy-compliant, provided by Facebook itself.

     For more technical Facebook tips, check our guide on how to enable right-click on websites — it’s handy for downloading images safely.

    4. Mobile Trick: View via Browser Mode:

    If you’re browsing on mobile:

    1. Open Facebook in a web browser, not the app.

    2. Tap the profile’s three-dot menu.

    3. Choose View Page Source or Copy Profile Link.

    4. Paste it into a new tab and change the URL from:

      m.facebook.com/profile_name

      to

      graph.facebook.com/profile_name/picture?type=large
    5. You’ll now see the publicly available display picture, if any.

    It’s a technical but legitimate method using Facebook’s Graph API.

    What Not to Do:

    Avoid the following — they violate Facebook’s terms and can risk your privacy:

    • Downloading or “unlocking” apps that promise full access

    • Browser extensions asking for a Facebook login

    • Sharing or reposting private photos without consent

    According to Facebook’s Privacy Policy, unauthorized data access can lead to account suspension or legal action.
    Stay ethical — curiosity shouldn’t compromise safety.

    Real-World Example:

    Imagine you reconnect with a college friend but find their profile locked.
    You:

    1. Visit mutual friends’ albums.

    2. Spot old tagged photos.

    3. Message them politely, and they will accept your request.

    Now, their full gallery becomes visible — no hacks, just simple respect for privacy.

    This approach not only solves your problem but also rebuilds connections genuinely.

    FAQ: Viewing Locked Facebook Profile Photos

    Q1. Can I view locked Facebook profile photos without being friends?
    You can only view photos that are publicly visible or tagged by mutual friends. Anything else is private.

    Q2. Is it legal to use third-party apps for this?
    No. Apps that bypass privacy settings violate Facebook’s terms. Use only official or public tools like Google Images.

    Q3. Why do some locked profiles still show cover photos?
    Cover photos are always public — Facebook requires them for profile recognition.

    Q4. Can I see my old locked profile photos?
    Yes. Use Facebook’s Download Your Information feature to retrieve them securely.

    Q5. Are cached photos in Google results still visible after locking a profile?
    They may remain temporarily visible until Google refreshes its index — but eventually, they disappear.

    Conclusion: Respect Privacy While Staying Curious

    Curiosity is natural — but respect for privacy is essential.
    If you want to view locked Facebook profile photos, the only safe and ethical way is to explore what’s already public, use legitimate tools, or reconnect as a friend.

    Remember: digital footprints tell stories, but trust builds real connections.
    So, use these methods wisely — and always prioritize online respect and data safety.

  • How to comment anonymously in Facebook Groups

    Facebook is a popular social media platform for sharing thoughts among millions of users worldwide. People choose to stay for both information and entertainment on Facebook. Now, they have a choice for more freedom to share thoughts and express feelings among other users, even without showing their identity with anonymous posting in Facebook Groups.

    This Facebook feature will not reveal your identity and allow you to speak freely in the respective group. You can also use other features, such as scheduling a Facebook post, to communicate at your desired time and frame.

    how to comment anonymously in facebook groups

    Why People Choose to Comment Anonymously:

    Being anonymous is a choice, and in some cases, it may be a necessity to express feelings by adopting the following conditions:

    • Privacy: The utmost choice to hide the identity, so that commenting may be hassle-free without revealing the identity or personal information.
    • Share Personal Stories: In some cases, you want to share some personal experience, but due to public interaction, you feel it necessary to comment without your name.
    • Ask a Sensitive question: Somehow, you have some issue or want some guidelines from the experts, so it is a choice to express the issue without showing your profile.
    • Expressing unpopular opinions: In some cases, people feel more comfortable expressing their opinions on any current or hot issue anonymously without fearing judgment or negative repulsion.
    • Freedom of Speech: Some Facebook users feel more convenient to express without a name, especially when raising a voice against corruption, misconduct, or any other issue.

    Conditions for anonymous posting:

    Although being anonymous while surfing the web has become common now, due to privacy reasons. Similarly, posting in Facebook groups may also be anonymous, but there are certain conditions to do that:

    • You must be a member of that Group.
    • The Facebook Group admin must enable anonymous posting.
    • Admins and moderators can see your identity, but other group members can’t.
    • You can’t tag, use photos, or send direct messages from an anonymous comment.
    • You can’t comment anonymously on someone else’s post.

    How to Comment Anonymously in a Facebook Group:

    Although being anonymous while surfing the web has become common now, due to privacy reasons, people prefer to do so. Similarly, while Facebook posts, there is a choice to comment anonymously. So, follow the steps to do so:

    • Join the Group that allows anonymous posting, or ask the group admin/moderator to allow it.
    • Locate the option of ” Anonymous Post” at the beginning of the group feed.
    • Read the guidelines and select” Create anonymous post.”
    • After writing a comment, ensure that the toggle beside “Post anonymously” is turned on.
    • Click submit.

    The post will be live after admin approval. Similarly, you can post on mobile devices from Facebook apps.

    Similarly, you can also follow the steps while using Facebook on Android and iOS devices to post anonymously in the Facebook groups.

    Frequently Asked Questions (FAQ,s)

    Q 1: Can I comment anonymously in any Facebook group?

    Answer: No, you can comment only in that Group where the admin has enabled the ” Anonymous Post” feature.

    Q 2: Can I reply to comments anonymously?

    Answer: No, Facebook doesn’t permit anonymous comments or replies—only original posts can be made anonymous (if that option is available).

    Q 3: Can I use a fake name to comment anonymously?

    Answer: No, creating fake profiles goes against Facebook’s rules and could get your account suspended.

    Q 4: Can I make multiple anonymous posts in the same group?

    Answer: Yes, if the group allows, then you can have an anonymous post and comment many times.

    Q 5: Can I edit or delete an anonymous post later?

    Answer: Yes, you can edit or delete your anonymous post/comment at any time.

    Privacy is the prime objective of every internet user, as well as social media users. While browsing, there are many options for being anonymous, like the use of proxy sites or VPN. The user is in seek of complete data protection along with the liberty to speak.

  • How to Unlink Facebook and Instagram Account

    Like other Social media, Facebook has become one of the emerging platforms for sharing thoughts and other updates. People around the globe are fond of this and like to share their updates automatically with other sites like Instagram and Twitter. Although Facebook has already introduced the solution by synchronizing your updates with Instagram and vice versa, you can be notified on both platforms without sharing your posts/updates separately on each of them.

    That’s cool…

    But somehow, you may wish to use both accounts separately.

    So first, see why it may be good to disconnect the auto update of one account to another.

    unlink facebook and instagram accounts

    Why unlink Facebook and Instagram Accounts:

    There may be some more reasons other than those stated below, but the main ones are here:

    • You may post on one platform, and Meta automatically posts this update to another one, so a user on both may be bored reading the repetitive post.
    • There may be security risks if, for any reason, your one Facebook account is hacked, then the hacker may access another account to use it for negative purposes, and you may face difficulty.

    4 Ways to Unlink Facebook and Instagram Accounts:

    If you want to disconnect both Instagram and Facebook accounts, then the following four methods are for you. You can use a smartphone app to unlink or use the web to separate them accordingly.

    One necessary thing to understand is that unlinking does not mean deactivating or deleting any account, but it will simply unlink the synchronization in such a way that you can not receive your account update from another account until you log in to access it separately.

    The methods described below have some similar steps to follow, so just follow any of them to achieve the purpose.

    1-Using the Facebook App to unlink the Instagram Account:

    Follow the steps:

    • Launch the Facebook app on your smartphone and tap on your Profile icon (located at the top right corner of your phone’s screen)
    • Scroll down to find Privacy & Settings.
    • Go to Settings and tap Meta Account Center.
    • Scroll down to go to accounts.
    • Tap the Remove button next to the account you want to remove.  A confirmation window with a message to remove the account. Just tap Remove account.
    • After that, another window with lost features will be displayed, just tap continue.
    • Finally, in the next window, tap Remove to unlink Facebook and Instagram accounts.

    2-Use of the Facebook Web to Disconnect the Instagram Account:

    Now we will use the Facebook web or desktop version to disconnect these two accounts.

    • Log in to your Facebook account by visiting Facebook’s official website and clicking on your Profile icon.
    • Go to Settings & Privacy and Open Settings.
    • Go to the Meta Account Center (located on the left side of the window)
    • Go to Accounts and click on the Account you want to remove.
    • A new pop-up window will open; just click on Continue.
    • A confirmation window will be opened. Click on Remove to unlink Instagram and Facebook accounts.

    3-Use the Instagram App to unlink your Facebook Account:

    Like the Facebook app, it is also very easy to disconnect Facebook and Instagram accounts.

    • Launch the Instagram app and go to the Profile icon on your smartphone.
    • Tap on the three horizontal lines that are located at the top right corner of a mobile screen.
    • Scroll down for  Settings & Privacy and go to Account Center.
    • Scroll down and tap on Accounts.
    • Now go for the account that you want to delete and tap on the Remove button.
    • Tap the Remove button again. A confirmation window will appear; just tap on the continue button.
    • After that, you will get a final confirmation screen, so just tap Remove to unlink your Instagram

    4-Use Instagram Web to unlink Facebook Account:

    The fourth effective way to unlink the two social media accounts is the use of the Instagram web version. So do the steps:

    • Log in to your Instagram account by visiting their official website and clicking on the More icon (three horizontal lines located at the left of your Profile window).
    • Open Settings and go to the Meta Account Center (located on the left side of the window)
    • Go to Accounts and click on the Remove button next to the Account you want to remove.
    • A new pop-up window will open; just click on Continue.
    • Finally, a confirmation window will be opened. Click on Remove to unlink Instagram and Facebook accounts.

    In this way, you can follow the steps from any of the above-mentioned methods to unlink your Facebook from your Instagram account.

  • How to Schedule a Facebook Post in Pages and Groups

    If you want to create a post to publish later at some specific time and date or want to schedule a Facebook post that was already published, then this article is for you.

    You can use this Facebook feature to schedule your Facebook post as and when for your desired day and even time for your Pages and Groups.

    Although this feature is only for groups and pages you own, you still have the opportunity to publish it whenever you want. Also, the page owners and moderators can only use this feature. There are many third-party software programs for Facebook Group Post Scheduler, but the following method is easy and risk-free.
    Schedule Facebook Post in Pages and Groups

    Why You should use this Facebook Scheduled Post feature:

    It is very interesting and might be useful to use this feature to schedule your Facebook posts and not memorize the day.

    • Posting to Facebook daily may be difficult, especially when you have to prepare as per the audience’s needs.  So it is easy to prepare and schedule them to save time, and it will also increase engagement.
    • Regular frequency posting is also admired and ranked by most search engines.
    • You have some kind of announcement for your staff or group fellows on a special day.
    • You want to post your content at a time when most of the targeted audience will be online. Especially in the case of international timezone audiences and you have to schedule posts for them accordingly.
    • You might be in some remote area in the future and want to schedule your page or group of people for some event.

    Quick Way to Schedule Facebook Posts on Desktop like a Pro:

    If you want to create a post and want to publish it at some specific time, then you can easily follow to do so.

    Use this Facebook feature for Facebook Pages.

    • Log in to Facebook on desktop >  From the left sidebar, right-click Pages and then select your page.
    • On your Page’s screen, go to the Publishing tool and click “Create Post” to compose the Facebook post that you want to schedule.
    • After creating content, click on the drop-down arrow beside the “Publish” button on the right side and click on “schedule post” to choose the best time to post it later.

    facebook activity log feature
    Click Save to schedule a Facebook Post. Now, Facebook will automatically schedule your posts for a specific time.

    If you want to edit or delete the scheduled posts, then just go to the “Publishing Page” and click on “Scheduled Posts” and enjoy this Facebook feature.

    Don’t forget to learn to unlink your Facebook account from Instagram in simple ways

    Use the Facebook Scheduled Posts feature for Groups:

    In order to schedule Facebook posts in your group, just follow:

    • Log in to Facebook and look for your group (you can locate your group in the left bar or simply use the Facebook search icon to check in your group)
    • Click “Write Something” to create a new post, and before hitting the Post button, just click on the Schedule Post icon in the bottom-right corner.

    scheduled Facebook Group Post


    • Go for your desired date and time, click Schedule, and then click the Post button to post.

    Tips for Scheduling Facebook Posts:

    While scheduling Facebook posts, follow the simple tips below to be more engaging and come up with excellent branding.

    • Daily frequency should not affect your writing standard, so always use the good stuff and try to check its grammar and spelling with some good tools.
    • Carefully choose the date and time to make your scheduled post more effective.
    • After scheduling posts, you also have the option to either pause them or delete them, because your posts may be related to the current issue, and you have to wait for the exact time, or you may no longer need them.
    • It is not necessary to schedule every event, because some events may not be fruitful for your audience, like check-ins, etc.
    • Lastly, track your posts’ events to check their success rate for future engagement.

    In this way, you can schedule a post in your Facebook Groups, and you can edit the date and time whenever you want before its scheduled time. Scheduling Facebook posts will save time and increase engagement.

  • How to Know which Apps can access your Facebook Data

    How to Know which Apps can access your Facebook Data

    We might come across a situation when we open an app for the first time and choose the option to open with Facebook instead of going through the process of creating an account. It might be a common practice, and it will not bother to think much instead of accessing the app and letting it use it.

    Usually, Facebook allows third-party apps to connect with your account for various purposes, like logging in, sharing posts, or accessing specific features. However, it’s crucial to monitor which apps have access to your Facebook data to ensure privacy and security.

    Read Also: Learn to comment anonymously in Facebook Groups.

    However, all third-party apps are reliable and worthwhile. So there must be some way to identify such Facebook apps to remove them from an account and further secure it from unethical users. Because, according to Facebook, each app that we may log in to gain access to our username, password, contact list, photos, gender, any other public information that we want to share, and much more.

    which websites and apps can access facebook data

     2 Ways to check which websites and apps can access our Facebook Data:

    There are easy ways to check that you have given access to your Facebook data. We have two ways to work out such options:

    By Using a Computer:

    If you want to know the third-party apps that can access your pictures. Just follow the steps:

    1. On your Facebook Profile page, open the top right corner, and tap the drop-down menu to access Settings & Privacy.
    2. In the window, tap Settings. On this page, you can also have more settings related to your profile page.
    3. On the left side of the page, scroll down and click on Apps and Websites, and soon a list of all active and expired apps will appear. You can view and edit settings or remove them to be safe from such unnecessary Facebook third-party apps.

    You can also unlink apps like Instagram to access your Facebook account to be more secure from any unauthorized use by anyone.

    On an Android Smartphone:

    Since most of the conversation is usually done on smartphones, it is necessary to go through the account to see the outdated and unnecessary Facebook apps to secure your Facebook data. Just go through the steps described below:

    1. In the Facebook app, tap the three horizontal bars at the lower right corner of the mobile screen.
    2. Scroll down and tap Settings and Privacy, and then Settings.
    3. Under Security, Tap Apps, and Websites.
    4. Tap each app and website that you may want to delete or update as per your preference.

    In this way, you have a choice as to whether you want to allow third-party apps to access Facebook data from your laptop and computer.

  • How to deactivate or delete Facebook account on Computer

    How to deactivate or delete Facebook account on Computer

    Want to deactivate or delete your Facebook account on your computer when you are at the right place to do so?

    We will learn the difference between deactivation and deletion of our Facebook account and the features that may affect this action. So stay tuned.

    As social media users, we have often come across a chance when we want to get rid of unwanted Facebook friend requests, disable a profile timeline, hide our friend list from the public, or even want to be away from the use of such social media platforms, and so on.

    So let’s see the complete solution.

    What is the difference between the Deactivation and Deletion of a Facebook Account:

    Facebook is providing two main options to discontinue using a Facebook account temporarily or permanently. We will first see the difference between these two to discontinue the use of Facebook.

    • Deactivating your Facebook account will temporarily disable it; you and other people will not access or see your posts. You can activate it whenever you want later. This option is useful when you want to discontinue the use of Facebook for some time.
    • Deleting your Facebook Account will delete all its settings, posts, etc, permanently, and even your friends and family won’t be able to see your profile and other Facebook activities.

    how to deactivate or delete Facebook account

    So let’s move further to learn the process and other queries about it.

    Don’t forget to use Tinder without a Facebook account.

    How to deactivate or delete your Facebook account:

    Deactivating or deleting a Facebook account is pretty easy; just follow the steps below:

    • Open your Facebook account on your computer and click on the top right corner drop-down arrow.
    • Click Settings & Privacy, and then click Settings to open your Facebook settings page.
    • On the Settings Page, click Your Facebook Information and then click Deactivation and Deletion under your Facebook Information.

    deactivate a Facebook account

    • In the next window, Facebook will ask you the reason for deactivating or deleting your Facebook account. Two options will be displayed if you want to deactivate temporarily or permanently delete it.
    • Whichever option you want, just check it and click your desired tab to continue to account deactivation or account deletion.

    Deactivating or deleting Facebook Account

    In this way, you can temporarily deactivate or permanently delete your Facebook account.

    When you select the second option of Delete Account, Facebook will delete your account and other information permanently. However, the good thing is that even after selecting the deletion option, Facebook will wait for some days for confirmation of account deletion, and during that, if you log in to the account, then your deletion option will be canceled automatically.

    So it is good that if you accidentally hit the delete account option, even Facebook will give you a chance to access it again by simply logging it from any device within a certain period.

    Why Deactivate or Delete a Facebook account and which features you can use or not:

    So, despite all these, some queries may arise:

    • Can I temporarily deactivate my Facebook account? – Yes, as mentioned above, a Facebook account can be temporarily deactivated for the prescribed period.
    • Is deactivating Facebook a good idea? – Although Facebook is a good source of info, still, if you still want to close or not use it for a limited time, then deactivating it is a better option than deleting it permanently.
    • Why do guys deactivate their Facebook? – There may be many reasons for deactivating the Facebook account, one of them being privacy. Due to a lot of third-party apps or advertisements, privacy may be breached. So they are much more aware of securing their Facebook account.
    • Is it better to deactivate or delete Facebook? – Deactivating Facebook is temporary and can be accessed at any time, so it is better to deactivate it if you want to discontinue it for a limited period. However, deleting Facebook will loss of the account as well as associated pages permanently.
    • Does deactivating your Facebook account delete everything? – When you deactivate your Facebook account, Facebook will save all your settings, posts, videos, and images to use later. Even if you want to delete your Facebook account, you can still download all your data to your local computer for your records.
    • How do you know if your Facebook account is deactivated or deleted? – If your Facebook account is deleted, then your name or profile ID will no longer be available in the Facebook search, or even your friends will not find you in their Facebook Friend list.

    So the above-mentioned methods to deactivate or delete the Facebook account and the queries related will surely help to improve Facebook productivity.

    Do comment with your feedback.

  • 3 Authentic Ways to Use Tinder Without Facebook Account

    3 Authentic Ways to Use Tinder Without Facebook Account

    Social media has become a great source to share thoughts among other internet users. Keeping in view of the social media site categories, the dating sites have built their own value, especially among the young ones.  There are millions of dating sites available to chit-chat and share thoughts with one another. Tinder is one of them, but unfortunately, to use Tinder without a Facebook account is a little bit difficult.

    Although the internet is immense with a lot of alternative ways to use this dating site, most of them are not reliable or might be a little risky for Facebook’s Privacy and Security.

    Since Tinder is a location-based online dating site that uses the user’s location and suggests nearby other Tinder users, Facebook information is its primary requirement. But not all users intend to show their personal information to other users, or they might be conscious of their Facebook Account security.

    use tinder without facebook account

    So, keeping all these features in mind, I have compiled a list of all the possible and secure ways to use this online dating app without a Facebook account. It can be easily downloaded for Android and iOS devices.

    What is Tinder?

    Before taking into account the use of Tinder without Facebook, let me introduce some basic info about this online digital dating website.

    Since it is a location-based dating site, as told earlier, it will bring the exact match to your interest and location and display it for you. The user can also collect information from other social media accounts as well, and can use it on this dating app.

    So if you want some chit-chat or online conversions, then you can continue using the Tinder account.

    This mobile app is available in the multi-language.

    Why Tinder is Using a Facebook Account to log in:

    Well, the question is genuine and asked by many of us why it requires Facebook Login to access Tinder…? The answer is quite simple:

    • Since Facebook is a growing social media platform, its authenticity is admired worldwide, which is why most sites, including Tinder, use it for login.
    • Bots and crawlers are the main sources of scamming ever, but in the presence of Facebook Login, all information can only be possible by a human.
    • Dating sites like Tinder usually need some basic info, like Name, age, and location, and in the presence of a Facebook login, all info is auto-inserted, which saves time to manually enter again.
    • Tinder usually uses the Location-based info for an exact match, so Facebook helps with it.

    How to Use Tinder Without a Facebook Account:

    It is quite difficult to access Tinder without using the Facebook Login, but here are some alternative ways to use a Tinder account.

    1- Edit Tinder info from Facebook App:

    If you are avoiding Facebook Login for Tinder,  just to hide it from everyone, then this method is for you.

    • Click the arrow at the top bar of the Facebook App > Click Settings
    •  Go to Apps on the right side of the Facebook Page > Select Tinder > Set App Visibility to Only Me.

    In this way, no Facebook friend can even know that you are using Tinder.

    2-Change Settings from Tinder Apps:

    This method is also quite easy to use the Tinder account. Because this method only requires changing the settings of the Tinder App on your smartphone.

    • Open the Tinder app on your smartphone.
    • Go to settings.
    • Uncheck Show me on Tinder Social.

    In this way, you will be able to hide your info on other social media as well.

    3-Create Another Facebook Account:

    In case you don’t want to share your personal Facebook info with other fellows, then there is an option to create another Facebook account.

    So just create another Facebook account (by using another email address) of equal value and your desired info (although it is a little bit unethical, but rather is useful to hide your identity for a dating site).

    Final Thoughts: Although the above working methods are enough to use Tinder, however, personal data and privacy are important. So always keep the use of this kind of social media site secondary, just to avoid any misuse of your info and data.

    Do comments with your feedback, and if you know any other way/method for our readers to use Tinder without a Facebook account.